Creating a juicy, flavorful chicken can transform a regular dinner into something special. Beer can chicken is one of those comforting dishes that brings together crisp skin and tender meat, making it ideal for casual weeknight meals, weekend barbecues, or family gatherings. Its simplicity allows for flexibility to adapt flavors or sides based on what you have. This recipe invites you into the process of cooking a delicious meal, so let’s get started.
Why You’ll Love This Beer Can Chicken
This method is both straightforward and dependable. It ensures the chicken stays moist while developing a rich, balanced flavor from the seasoning and beer. The ease of preparing beer can chicken makes it a practical choice for everyday cooking, whether you are feeding a family or hosting friends. You’ll find it becomes a favorite recipe that you return to often.
Kitchen Tools You’ll Need
- Roasting pan or grill
- Basting brush
- Meat thermometer (optional)
- Tongs
Ingredients
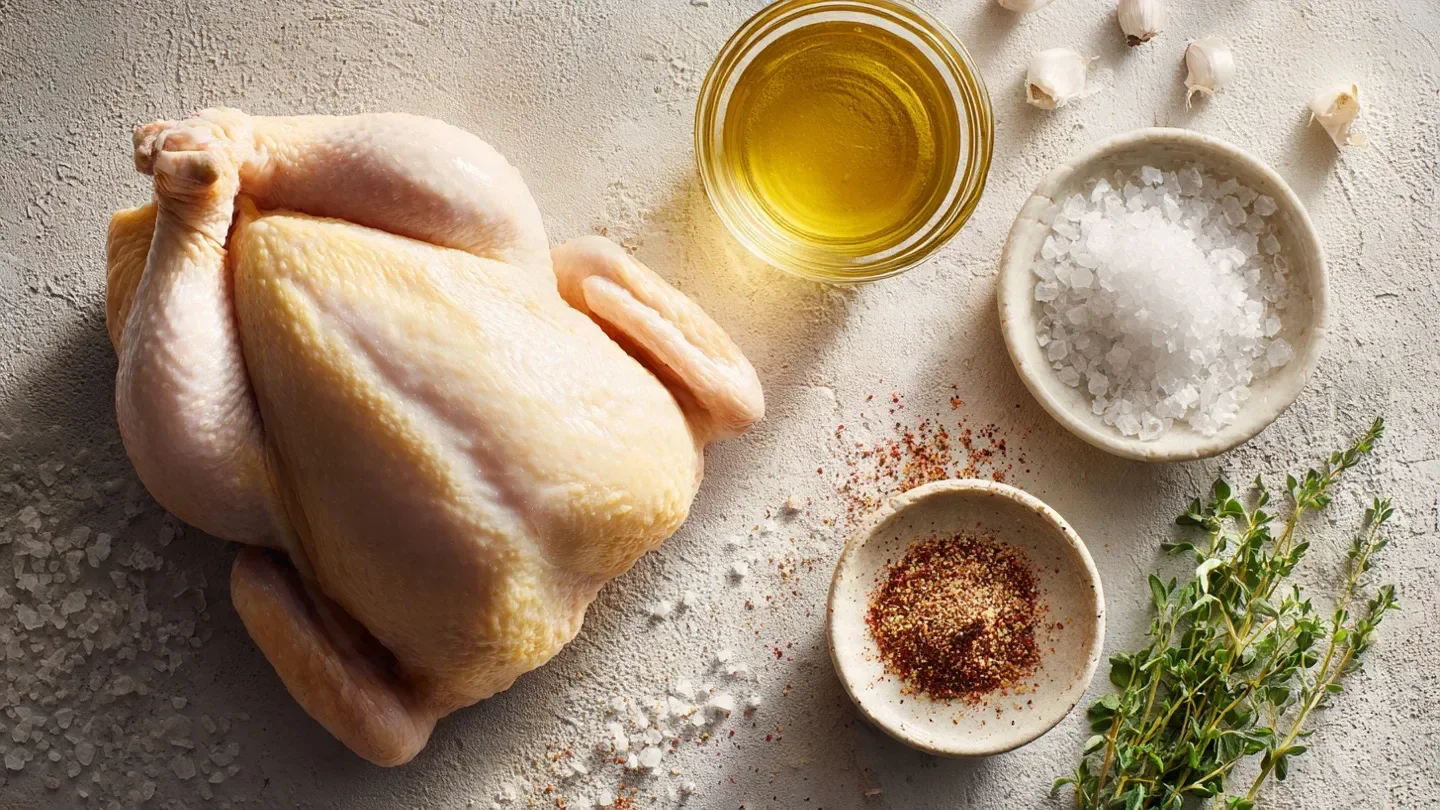
- 1 whole chicken (4 lb) (provides structure and moisture)
- 2 tablespoons olive oil (adds richness and helps the rub adhere)
- 1/4 cup BBQ rub (homemade or store-bought) (brings flavor and spice)
- 1 teaspoon kosher salt (enhances overall flavor)
- 1 can beer (adds moisture and flavor during cooking)
- Fresh herbs for garnish (optional) (provides color and fragrance)
How to Make Beer Can Chicken
Step 1. Begin by preheating your grill or oven. If you’re using a grill, prepare it for indirect cooking. This method allows the heat to circulate around the chicken, ensuring even cooking and a crispy skin. If using an oven, preheat it according to your preferred cooking method.
Step 2. Next, take the whole chicken and pat it dry with paper towels. This step is crucial as it helps to remove excess moisture, leading to a crispier skin. Once dried, brush both the inside and outside of the chicken with olive oil to enhance flavor and help the seasoning stick.
Step 3. After that, generously apply the BBQ rub all over the chicken, making sure to get it into any folds and creases. The rub adds a deep flavor profile and a nice crust as it cooks. Don’t forget to sprinkle the kosher salt evenly over the chicken; this helps enhance the flavors of the meat.
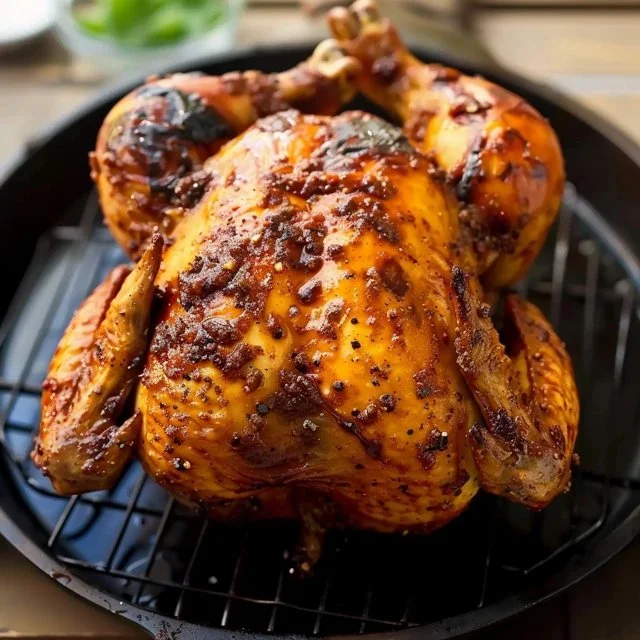
Step 4. Open the can of beer; you’ll want to use about half of it for cooking. Lift the chicken upright and insert the beer can into the cavity. This method helps to keep the chicken moist from the steam produced by the beer while it cooks. Position the chicken so it can stand on the can safely, usually by securing it in a roasting pan or on the grill.
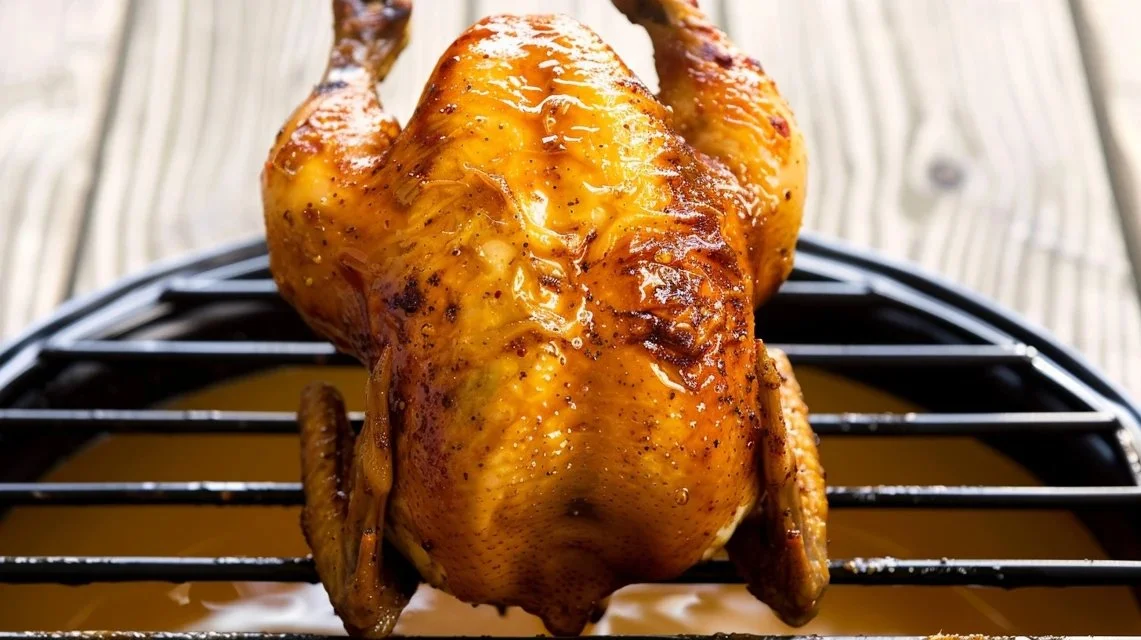
Step 5. Place the chicken on the grill or in the oven. Make sure that it is stable. As the chicken cooks, the skin should begin to turn a nice golden brown, and the meat should pull away from the bone easily when it’s done.
Step 6. Allow the chicken to cook until it reaches the desired doneness. Using a meat thermometer can help ensure it’s cooked properly. Insert it into the thickest part of the thigh, not touching the bone. You’re looking for an internal temperature of 165°F, which means it’s safe to eat.
Step 7. Once the chicken has reached the appropriate temperature, carefully remove it from the grill or oven. Let it rest for approximately 10-15 minutes before attempting to carve it. This rest time is essential as it allows the juices to redistribute within the meat, keeping it moist and flavorful.
Step 8. Finally, if desired, garnish the chicken with fresh herbs for a bit of color and added flavor. This adds a lovely touch and complements the overall presentation. Now your beer can chicken is ready to serve, inviting everyone to enjoy its deliciousness.
Serving Suggestions
Beer can chicken is quite versatile. It can be an ideal weeknight dinner paired with simple sides like a fresh salad or roasted vegetables. Leftovers are great for weekday lunches or even chopped into salads. Imagine using it as a topping for nachos or mixing into tacos for a quick and satisfying meal. For breakfast, you could mix the chicken into scrambled eggs for a hearty start to the day or enjoy it as a savory snack any time.
Pro Tips for Best Results
- Ensure the chicken is fully dried before seasoning to help achieve crispy skin.
- Use a BBQ rub with a flavor profile you enjoy to complement the chicken.
- Be cautious when removing the chicken from the grill or oven; the can will be hot.
- Let the chicken rest adequately after cooking for the best texture.
- Experiment with different beers to discover new flavors; lighter beers yield a milder flavor while darker beers can add depth.
- If you notice the skin browning too quickly, cover the chicken loosely with foil to prevent burning.
Common Mistakes to Avoid
- Not drying the chicken: Skipping this step can lead to soggy skin, preventing that crispy texture you want. Always pat your chicken dry before applying oil and seasoning.
- Using too much beer: Overfilling the can can create too much steam, leading to excess moisture. Use about half a can to maintain a balance of moisture and flavor without making the skin soggy.
- Rushing the resting time: Cutting into the chicken too soon will cause juices to run out, leading to dry meat. Let it rest for 10-15 minutes for the best results.
- Not checking doneness: Guessing the cooking time can lead to undercooked or overcooked chicken. Use a thermometer for accuracy, targeting an internal temperature of 165°F.
- Forgetting to stabilize the chicken: If the chicken isn’t securely positioned on the can, it may tip over during cooking. Ensure it stands upright in a stable manner.
- Over-seasoning: Applying too much rub or salt can overpower the flavor. A light, even coating usually brings out the best in your chicken.
Variations & Substitutions
While this recipe is straightforward, you can explore different BBQ rubs for varying spices and flavors. Consider using a citrus beer for a lighter, fresher taste. Alternatively, using a soda instead of beer can create an interesting twist, providing sweetness and moisture.
Storage & Reheating
Once the chicken has cooled, store it at room temperature for no more than two hours. For longer storage, place it in the refrigerator in an airtight container, where it can last up to three days. If freezing, wrap the chicken tightly to prevent freezer burn and keep it for up to three months. When reheating, using an oven or microwave can help maintain moisture, but be mindful not to overcook it, as this can dry out the meat.
Frequently Asked Questions
Can I make this recipe ahead of time?
While beer can chicken is best enjoyed freshly made, you can roast it ahead of time. To maximize freshness, reheat it in the oven to preserve moisture, as microwaving may dry it out.
How long does it last in the fridge?
Leftover beer can chicken can last in the refrigerator for about three days. Make sure it is stored in an airtight container to keep it fresh.
Can I freeze this recipe?
Yes, you can freeze beer can chicken. Wrap it tightly in plastic wrap or foil to prevent freezer burn. It will retain quality for about three months.
What can I substitute for one ingredient?
If you don’t have BBQ rub, you can create a simple seasoning mix using paprika, garlic powder, and brown sugar for a different flavor profile.
Why didn’t my recipe turn out as expected?
Common issues include uneven cooking or dry chicken. Make sure to center the chicken properly on the beer can and check your thermometer for accurate temperature readings.
Final Thoughts
Making beer can chicken offers a satisfying experience with its straightforward preparation and delicious outcome. This recipe is a fantastic way to enjoy a classic meal that’s sure to make its way into your regular cooking rotation. The joy of sharing this dish with loved ones only adds to its comfort. Enjoy the simple process and the rewarding results it brings.

Beer Can Chicken
Ingredients
Main Ingredients
- 1 whole whole chicken (4 lb) provides structure and moisture
- 2 tablespoons olive oil adds richness and helps the rub adhere
- 1/4 cup BBQ rub (homemade or store-bought) brings flavor and spice
- 1 teaspoon kosher salt enhances overall flavor
- 1 can beer adds moisture and flavor during cooking
- to taste none Fresh herbs for garnish (optional) provides color and fragrance
Instructions
Preparation
- Begin by preheating your grill or oven. If you’re using a grill, prepare it for indirect cooking.
- Pat the whole chicken dry with paper towels to remove excess moisture.
- Brush both the inside and outside of the chicken with olive oil.
- Generously apply the BBQ rub all over the chicken, getting it into any folds and creases.
- Sprinkle the kosher salt evenly over the chicken.
- Open the can of beer and use about half of it for cooking. Insert the beer can into the cavity of the chicken.
- Place the chicken upright, securing it in a roasting pan or grill.
Cooking
- Cook the chicken on the grill or in the oven, ensuring it is stable.
- Allow the chicken to cook until it reaches an internal temperature of 165°F, checking with a meat thermometer.
Resting & Serving
- Carefully remove the chicken from the grill or oven and let it rest for 10-15 minutes before carving.
- Garnish with fresh herbs if desired, and serve.